Welcome to the how to use the iPhone 16e camera tutorial. If you just picked up the iPhone 16e, you’re holding one of the most capable smartphone cameras Apple has ever made. But with so many features tucked away in menus and swipe gestures, it’s easy to overlook what your iPhone 16e camera can actually do.
In this iPhone 16e camera tutorial, I’ll walk you through everything — from the basics like how to take better photos, to unlocking hidden camera settings that even seasoned users miss.
Whether you’re a total beginner or just looking to level up, this guide covers the most important iPhone 16e camera tips, settings, and features so you can take stunning photos and videos.
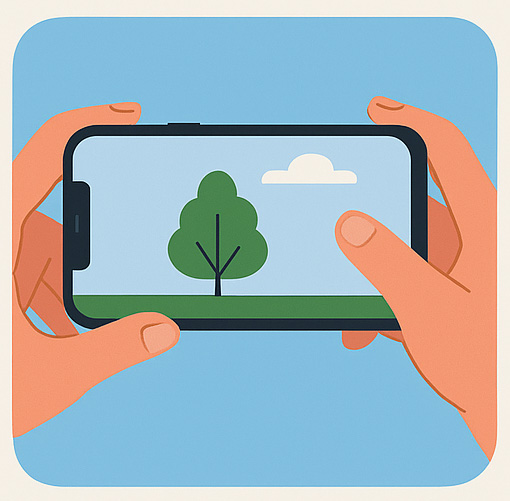
The default Photo mode on the iPhone 16e is where most of your everyday shots will happen. It’s smart enough to auto-focus and auto-expose — but there are some manual tweaks that can give you better results.
Steps:
Open the Camera app
Make sure you’re in “Photo”
Tap your subject to focus
Swipe up/down on the screen to adjust exposure
Tap the shutter or press a volume button to take the shot
Tip: Turn on the grid in Settings > Camera > Grid to use the rule of thirds for better composition.
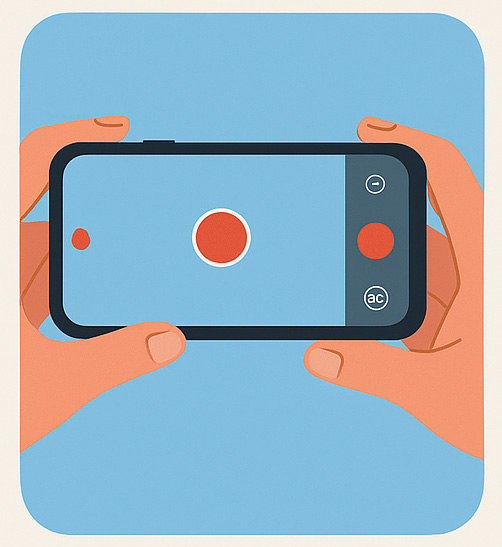
🎥 iPhone 16e Video Settings & Features
The Video mode on the iPhone 16e can shoot in up to 4K at 60fps, and it supports features like cinematic stabilization and even pause and resume during recording.
How to Record Video on iPhone 16e:
Swipe to Video mode
Tap the resolution label to switch between 1080p and 4K
Tap the frame rate to select 24, 30, or 60fps
Hit the red record button to start
Tap again to stop (or pause/resume if enabled)
Pro Tip: Go to Settings > Camera > Record Video to set your default recording preferences.
📸 iPhone 16e Portrait Mode: How to Blur Backgrounds
Portrait mode uses depth sensors to create a natural-looking background blur (bokeh). It’s perfect for people, pets, or objects.
Steps:
Swipe to Portrait mode
Make sure your subject is well-lit and within 2–8 feet
Wait for “Natural Light” or other lighting mode to activate
Tap the subject to focus and take the shot
🌌 How to Use Night Mode on iPhone 16e
When you’re in a low-light environment, Night Mode activates automatically.
How to Use It:
Point your iPhone 16e in a dimly lit space
Look for the yellow Night Mode icon
Tap it to adjust the exposure time (1–10 seconds)
Keep the phone steady while shooting (tripod recommended)
Tip: The longer the exposure, the more light your camera can capture — but you’ll need to keep it stable.
🔦 Turning On Flash & Live Photos on iPhone 16e
Flash is useful in dark scenes where Night Mode doesn’t help. Live Photos add motion and sound before/after the photo.
To Turn On Flash:
Tap the arrow at the top of the Camera app
Tap the Flash icon and set it to On, Off, or Auto
To Enable Live Photos:
Tap the concentric circles icon (Live Photo) in Photo mode
🌟 How to Use Photographic Styles on iPhone 16e
This unique feature lets you choose a custom tone and contrast style that stays consistent across your shots.
To Set Photographic Styles:
Go to Settings > Camera > Photographic Styles
Choose from Standard, Rich Contrast, Vibrant, Warm, or Cool
Your selected style applies to new photos automatically
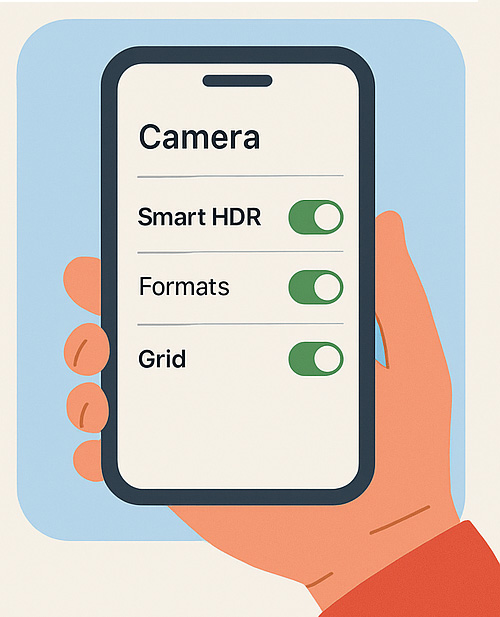
📝 iPhone 16e Camera Settings You Should Change Right Away
There are a few hidden settings that can totally upgrade your shooting experience:
Preserve Settings: Saves your last-used mode, filters, or exposure (Settings > Camera > Preserve Settings)
Formats: Choose High Efficiency (HEIF) or Most Compatible (JPEG) for easier sharing (Settings > Camera > Formats)
Smart HDR: Helps balance highlights and shadows (turn it on in Camera Settings)
🔰 How to Lock Exposure and Focus
When you want consistent lighting and focus:
Tap and hold on your subject until AE/AF LOCK appears
This prevents the camera from auto-adjusting
📅 How to Set a Timer or Take Burst Photos
Need to be in the photo or capture action shots?
Set a Timer:
Tap the arrow at the top
Tap the Timer icon and choose 3s or 10s
Take Burst Photos:
Press and drag the shutter button left
All photos save in a stack — choose your best later
🌐 How to Use Pano, Slo-Mo, Time-Lapse & Front Camera
Pano Mode: Swipe to Pano and slowly follow the guide arrow for wide scenes
Slo-Mo & Time-Lapse: Perfect for action or creative effects (swipe to their modes)
Front Camera: Tap the flip icon to switch cameras, great for selfies or video blogs
📲 Extra iPhone 16e Camera Tips:
Use Grid Lines: Settings > Camera > Grid – helps align your shots
Mirror Front Camera: Settings > Camera > Mirror Front Camera – flips selfies to look natural
Show Detected Text: Just point your camera at any text — a yellow box will appear so you can copy, translate, or look it up
✨ Customize the Action Button to Launch the Camera
The iPhone 16e Action Button can launch your camera instantly:
Go to Settings > Action Button
Choose “Camera” or even assign a Shortcut to open specific modes like Portrait or Video
🔗Get The Most Out Of Your iPhone 16e Camera
The iPhone 16e camera is more than just point and shoot — it’s a creative tool packed with professional-grade features. By mastering the modes, settings, and tips above, you’ll be ready to take better photos and videos with confidence.
Whether you’re a casual user or building a content brand, this iPhone 16e camera tutorial gives you all the tools to succeed.
Buying an iPhone is not cheap and that is why it is important for you to learn as much as you can to get the most out of your phone. The tips, tricks, and tutorials you will find here are just the beginning.
We use cookies on our website to give you the most relevant experience by remembering your preferences and repeat visits. By clicking “Accept All”, you consent to the use of ALL the cookies. However, you may visit "Cookie Settings" to provide a controlled consent.
This website uses cookies to improve your experience while you navigate through the website. Out of these, the cookies that are categorized as necessary are stored on your browser as they are essential for the working of basic functionalities of the website. We also use third-party cookies that help us analyze and understand how you use this website. These cookies will be stored in your browser only with your consent. You also have the option to opt-out of these cookies. But opting out of some of these cookies may affect your browsing experience.
Necessary cookies are absolutely essential for the website to function properly. These cookies ensure basic functionalities and security features of the website, anonymously.
Cookie
Duration
Description
cookielawinfo-checkbox-analytics
11 months
This cookie is set by GDPR Cookie Consent plugin. The cookie is used to store the user consent for the cookies in the category "Analytics".
cookielawinfo-checkbox-functional
11 months
The cookie is set by GDPR cookie consent to record the user consent for the cookies in the category "Functional".
cookielawinfo-checkbox-necessary
11 months
This cookie is set by GDPR Cookie Consent plugin. The cookies is used to store the user consent for the cookies in the category "Necessary".
cookielawinfo-checkbox-others
11 months
This cookie is set by GDPR Cookie Consent plugin. The cookie is used to store the user consent for the cookies in the category "Other.
cookielawinfo-checkbox-performance
11 months
This cookie is set by GDPR Cookie Consent plugin. The cookie is used to store the user consent for the cookies in the category "Performance".
viewed_cookie_policy
11 months
The cookie is set by the GDPR Cookie Consent plugin and is used to store whether or not user has consented to the use of cookies. It does not store any personal data.
Functional cookies help to perform certain functionalities like sharing the content of the website on social media platforms, collect feedbacks, and other third-party features.
Performance cookies are used to understand and analyze the key performance indexes of the website which helps in delivering a better user experience for the visitors.
Analytical cookies are used to understand how visitors interact with the website. These cookies help provide information on metrics the number of visitors, bounce rate, traffic source, etc.
Advertisement cookies are used to provide visitors with relevant ads and marketing campaigns. These cookies track visitors across websites and collect information to provide customized ads.